# Provision of a Development Environment
# Local Kubernetes Custer
The Unikube CLI provides a convenient procedure to set up a Kubernetes-based development environment (unikube project up). This K8s cluster can be initially started, stopped, resumed and delete with the CLI. The infrastructure is encapsulated in the concept of a project. The Unikube CLI currently allows you to have at most one project cluster running at a time. If you need to work on another project, you need to stop the project you have worked on before.
The project cluster can be created using different Kubernetes-providers. Currently, k3d is the default cluster provider as it allows you to have multiple separate clusters side-by-side on one local machine. There will be other Kubernetes-providers like microk8s, minikube or dedicated remote K8s clusters in the future. The Unikube CLI will, however, abstract those details and provide you a uniform interface.
# What is a Deck?
Deck is a new concept coming with Unikube. A simple attempt to explain it would be:
“A deck is the smallest installable unit in Unikube”
To stay with the nautical metaphors around Kubernetes: You may work on a large ship and that very ship is divided into multiple decks. You can work one day on deck A - and on deck B the other day. However, since both decks are on the same ship they share a common ground. The Unikube team decided to call installable units a deck, because even the smallest ships has at least one deck. Decks on a ship usually serve different purposes or offer certain capabilities and so are decks in Unikube.
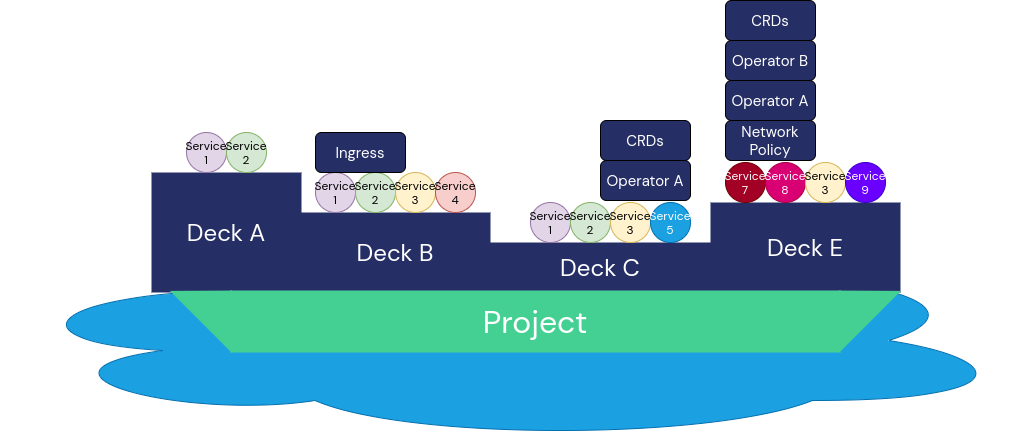
I asked my daughter to draw a ship with multiple decks and different Kubernetes-resources on them. That’s what she did. I hope that helps to get the metaphor across.
Decks do share common components which might end up as a production platform playing together. However, since it is not always feasible to run the entire production infrastructure on your Pentium i3 notebook, decks form a certain excerpt for you to work on. Just enough to get your work done in the required context. If you need another deck, ask your operators to create it upon your requirements or go on and define it yourself.
# Deck Installation
Installing a deck is quite simple. You run:
unikube deck install
Select a deck (or pass it as an argument) and the Unikube CLI prepares everything for you. Just wait until you cluster is ready.
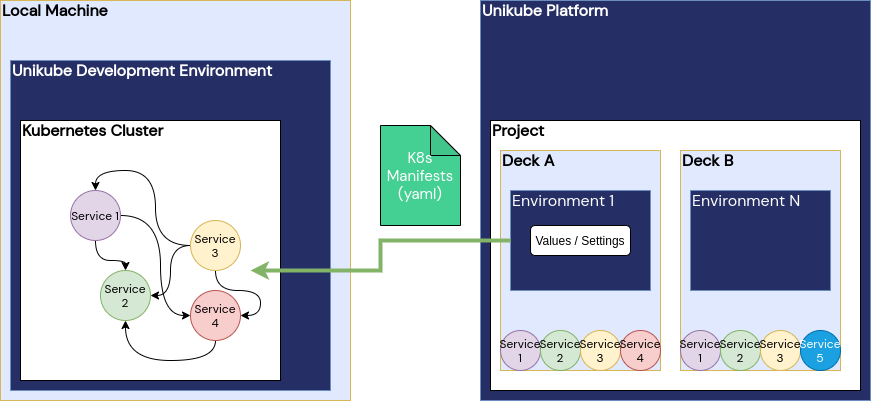
After running unikube deck install the Unikube platform prepares the workload manifests and everything and sends it to the CLI to apply it in the development cluster
Depending on the Environment settings on the Unikube platform, a deck is installed to a dedicated K8s namespace. If it’s required you can still access this cluster using kubectl and manage things yourself. However, the Unikube team is working hard to make this an obsolete option.
# Deck Uninstallation
You can uninstall a deck as well. The command unikube deck uninstall allows you to select the unneeded deck and removes it from your cluster.
# Delete a Project
Once your project is completed and there is no task for you left (more or less a theoretical construct), or you want to free some resources on your Pentium i3-notebook, you can run unikube project delete.
DANGER
Deleting a project removes the entire Kubernetes cluster and doesn’t leave anything behind. This is terminal.