# Developing with Unikube
# Introduction
Unikube does not simply give you the possibility to set up and run a local Kubernetes cluster. It aims to be an application development system. Unikube developers are able to write code directly within a Kubernetes environment without the need to take care of any Kubernetes aspects.
This chapter describes how you can prepare an application development setup to leverage the full convenience of the Unikube CLI.
# Interactive Shell
For a range of different tasks you may have to run application specific commands in your service, for instance to create a superuser. In order to easily get an interactive shell in an app container run:
unikube app shell
You will be prompted with all available apps in your current project context. Select the one you want and go ahead with your command line superpower.
# Switch operation
The command unikube app switch is the central entry point for local Kubernetes-based development. The idea is to literally switch a locally running container with an instance running in a (Unikube provided) Kubernetes cluster. All network traffic from and to the cluster instance is then tunneled to the local application. This enables developers to make changes to the source code, files, environment variables (and other settings) and let them run in the context of all the other attached services.
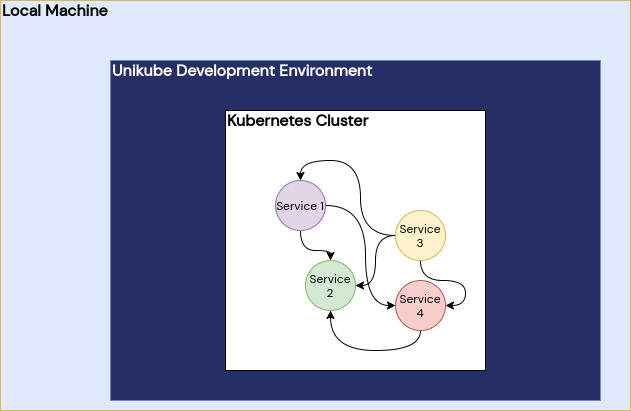
After running unikube deck install (see unikube deck install) a Kubernetes cluster is running all services.
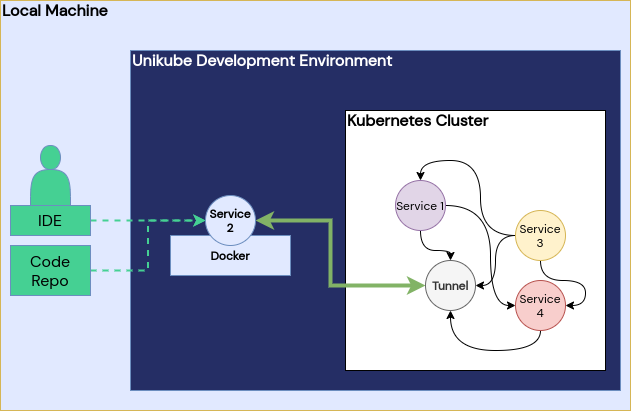
The command unikube app switch starts a local container and tunnels all traffic to the target within the cluster.
You may run the switch command with a long parameter list, or execute the command from a location containing a Unikubefile.
Before the actual switch operation is started, the Unikube CLI builds the container image according to the specification in the Unikubefile. Be sure your image can actually build with these parameters. The next step is to start the container from your Dockerfile and mount the source code as volume in the container to always work with the latest code. If you have overwritten environment variables they will be set in the container as well. Before you can see the traffic hitting your local container you will be prompted for your root password. The Unikube CLI has to perform DNS modifications on your host system in order to be able to reach services within the cluster.
If everything went fine up to here and your application server supports code hot-reloading you can see changes in your current working tree immediately reflected in the cluster. You can still enter this container on an interactive shell with the unikube app shell command.
This feature is realized with Telepresence 2.
# Unikubefile
The Unikubefile is a file with yaml notation, that should contain all necessary information for Unikube about the service. It specifies a Docker build, volumes, environment, commands and context. The file must be named unikube.yaml for the command unikube app switch (see unikube app switch) to be automatically used.
The unikube.yaml schema look like this:
version: "1"

apps:
  <app>: # title of this app
    context: # context information for the CLI
      organization: <Organization ID>
      project: <Project ID>
      deck: <Deck ID>
    build:
      context: <Path to Docker build root>
      dockerfile: <Path to Dockerfile>
      target: <Dockerfile build target>
    deployment: <Name of the Deployment in the cluster>
    port: <Number of the container port to be switched> (optional)
    command: <Starting command> # overwrite the run command of the services during development
    volumes:
      - <Path to the volume mounts> # overwrite the container's source directory with your working tree
    env:
      - <Environment variable>:<Value> # overwrite environment variables from the deployment, see: unikube app env
Most of the keys in the Unikubefile are optional. Here is a description what those keys control:
context: The sub-keys of the first level context item are used control the CLI’s context. For your convenience you can set the organisation, the project and the deck this service belongs to. You don’t have to specify this during the switch operation anymore.
build: This section belongs to the Docker build process just before the switch operation. Please refer to the Docker documentation for more details.
deployment: This is the target Kubernetes deployment for the switch operation. This must exactly match the name of the deployment running in the cluster.
port: In case there are multiple containers in a Kubernetes deployment specified (because there are multiple containers) this sets the correct target port. It defaults to the first if not specified.
command: If your container does not specify a run command or you want to overwrite it, that’s the place for it. Write it as a single string.
volumes: Specify volume mounts for the development container, for instance your current working tree.
env: Overwrite existing environment variables (such as debug flags) or add new environment variables. Please request these new environment variables at your Kubernetes manifest author if you need them in production as well.
The source repository of the project should include a valid Dockerfile and a Unikubefile to run this operation as smooth as possible.
# Context
Unikube’s CLI can manage organisations, projects, decks and interact with apps. As it can be cumbersome to enter identifiers again and again, you can set a context for the commands to implicitly assume a certain unit (pretty much the same as with kubectl). In order to set a context, run the context commands.